The Creature Spawns Editor
This editor is compatible with Ark: Survival Evolved projects and requires Beacon Omni. All users may use this editor, but only Omni users will be able to generate config files from it.
Ark server admins are given great control over the game’s spawn system. Admins can add creatures/dinos to certain parts of the map, remove creatures, increase levels, and even change colors. This powerful editor requires great care though, as it’s easy to create an overspawning problem.
Add a Spawn Point
Just like editing loot drops in Beacon, spawn points must be added to a file before anything will change on the server. Spawn points not added to Beacon will be left as default.
Press the New Point button to begin adding a spawn point.
The Filter field at the top allows searching the spawn points. To the right of the Filter field is a switch that allows searching by spawn point or by creature. When set to Creatures, type the name of a creature and Beacon will show all the spawn points that include the creature.
Tip
Users can select multiple spawn points to be added at the same time. Hold shift while selecting points to select a range. Windows users can use Control while clicking to select non-sequential spawn points, and Control-A will select all. Mac users should substitute the Command/Apple key for Control.
The next step is to select a Mode value. Replace Default Spawns will replace all creatures in the spawn point with the ones specified in Beacon. When this option is selected, the Load Simplified Default Spawns checkbox will add the spawn point with default spawn data loaded in. The Add to Default Spawns mode allows adding new creatures without affecting the current creatures. And Remove from Default Spawns allows removing one or more creatures without affecting the other creatures.
Adding Shinehorns to Beaches
In this tutorial, the goal is to add Shinehorns to the beaches on The Island. Press the New Point button, select Beaches in the list, and set the Mode to Add to Default Spawns.

Press OK when ready. Next, add a new spawn set by pressing the New Set button in the Spawn Sets column. This will create and select a new spawn set. Use the Name field to call the spawn set Shinehorns. The Weight field in the upper right works exactly the same as every other weight value in Ark. Ark’s default weight values are always less than or equal to 1.0, so Beacon defaults the weight to 0.5. The Beaches spawn point often uses much lower values, so to prevent being overrun by Shinehorns, set the Weight field to 0.06.
Tip
Create a new Beacon project, switch to Creature Spawns, and add the same spawn point in Replace Default Spawns mode with Load Simplified Default Spawns selected. Then look through the weights of each default spawn set to help decide on an appropriate weight value.
Next, press the Add button in the Creatures box. In the Creature Entry dialog, press the Choose… button next to Creature and select Shinehorn. Leave all the other fields empty, they are not needed in this step.
Ark spawns creatures in packs. Every row in the Creatures list represents one member of the pack. This is how the game always spawns Carnos with a Yuty.

To save time, consider using the Auto Creature tool in the Spawn Sets column. This will create a new spawn set with common values, as well as choosing a pack size. Beacon will choose spawn set weights to best fit with the existing spawn sets.
Lastly, it is important to limit the number of Shinehorns that will spawn in the area. Press the New Limit button in the Limits section to define a new limit. From the Creature menu, select Shinehorn and set the Max Percentage to 5. This will limit the number of Shinehorns in each of the spawn point nodes to 5% of the spawn point node’s total population.
Understanding Limits
The limits work by counting the number of the limited creature that is already at the spawn point node, and preventing a new spawn if that number is already over the limit. So, for example, setting the limit to 0.0001% does not mean the creature will not spawn. When there are 0 at the point the creature can still spawn because 0 ÷ 40 = 0 is below 0.0001. As soon as 1 spawns, the limit is reached because 1 ÷ 40 = 0.025 is greater than the limit of 0.0001.
Spawn Point Nodes and Population Limits
A spawn point isn’t any one point. Similar to the same loot drop being able to appear at multiple locations on the map, spawn points are also placed on the map one or more times. Every time a spawn point is placed on the map, we call that a spawn node. For example, The Island has 76 nodes for Beaches. Population limits apply to each node, not to the total population. This means certain designs may not possible depending on the spawn point. An example might be trying to add a single Giga to the beaches. Even with a super low limit of 0.000001%, this allows at most 1 to spawn at each of the map’s 76 nodes. So rather than 1 giga on the beaches, you would wind up with 76 gigas on the beaches.
For this reason it is strongly recommended to keep “like” creatures together. Major creatures often have their own dedicated spawn points because they come with smaller populations and have fewer nodes per map. Adding Magmasaurs to the Gigas spawn point works much better than adding Magmasaurs to the Jungles spawn point.
The Other Settings
Creature Settings
- Offset (X, Y, Z): Allows moving the creature away from the spawn set offset in three dimensional space, measured in centimeters. Y is the North/South axis, X is the East/West axis, and Z is the height/depth axis. 0, 0 is the South West corner of the map.
- Override Range: Can choose a specific range of levels for the creature to spawn. This could be used to make certain pack members higher level than others. If you change difficulty, the range will change too.
- Level Offset: Instead of choosing a specific range for the creature, additional levels can be added or removed.
- Level Multiplier: In addition to a fixed number of levels to add or remove, levels can be multiplied.
Spawn Set Settings
- Offset (X, Y, Z): Allows moving the spawn set away from the spawn point node in a three dimensional space, measured in centimeters.
- Distance from x Multiplier: These three settings allow users to increase or decrease the distance the creature must be from players, structures, or tames before the creature can spawn. Values greater than 1.0 will require more space, values less than 1.0 will require less space.
- Spread Radius: Introduces a random amount of distance away from the spawn point node’s center + set offset to make spawns feel more natural. Value is in centimeters.
- (Water Only) Min Height: For water spawns, this is the depth the spawn set needs to spawn. This is to prevent sharks from spawning in puddles, for example. 140 is a common value, larger creatures should use 520.
- Colors: The creatures in the spawn set can spawn with different colors than normal. Not all color sets are noticeable on all creatures, and some creatures such as the X variants will not show colors at all. See this Reddit discussion for additional details.
- Add Level Offset Before Multiplier: This option will change how the level calculations are performed. When selected, the Level Offset will be added to the creature’s level first, then the Level Multiplier applied. When not selected, the Level Multiplier is applied first, then the Level Offset is added. These values are described in the next paragraph.
The Level Range, Level Offset, and Level Multipliers allow changing the level that creatures will spawn. Ark uses this for cave spawns, for example. Use Level Range to specify a range for the creature. The levels will automatically scale if the server difficulty is changed. Level Offset is a fixed number of levels to add or remove. Level Multiplier will multiply the creature’s level. A value of 2 would turn a 120 creature into a 240 creature, for example.
Creature Replacements
A spawn set can exchange creatures for other creatures. This could be used to give some variety to a pack. For example, this feature could be used to add a small chance to replace a Carno in a Yuty pack with a Rex. The creature to be replaced must exist in the Creatures list.
Tip
Most spawn sets have no use for this feature. The maps control creature variant substitutions, so adding alphas, aberrants, or other variants will not work.
- Start by pressing the Add button in the Creature Replacement list.
- Choose Carno for the Target Creature.
- Press Add Creature… and select both Carno and Rex. Press Select to add both to the list.
- Set replacement weights so that Rex only has a 5% chance to spawn in place of Carno. This can be achieve with weight 95 for Carno and 5 for Rex.

Removing Creatures
When removing creatures from a spawn point, most options are not useful at all. Use a Spawn Set and list the creatures that should be removed in the Creatures list.
Choosing a Spawn Point
Figuring out which spawn point to use can take practice, so here are some tips the community has learned.
The Ark wiki has spawn maps available to help visualize each point.
- The Island Spawn Map
- Scorched Earth Spawn Map
- Aberration Spawn Map
- Extinction Spawn Map
- Genesis Part 1 Spawn Map
- Genesis Part 2 Spawn Map
- The Center Spawn Map
- Ragnarok Spawn Map
- Valguero Spawn Map
- Crystal Isles Spawn Map
- Lost Island Spawn Map
- Fjordur Spawn Map
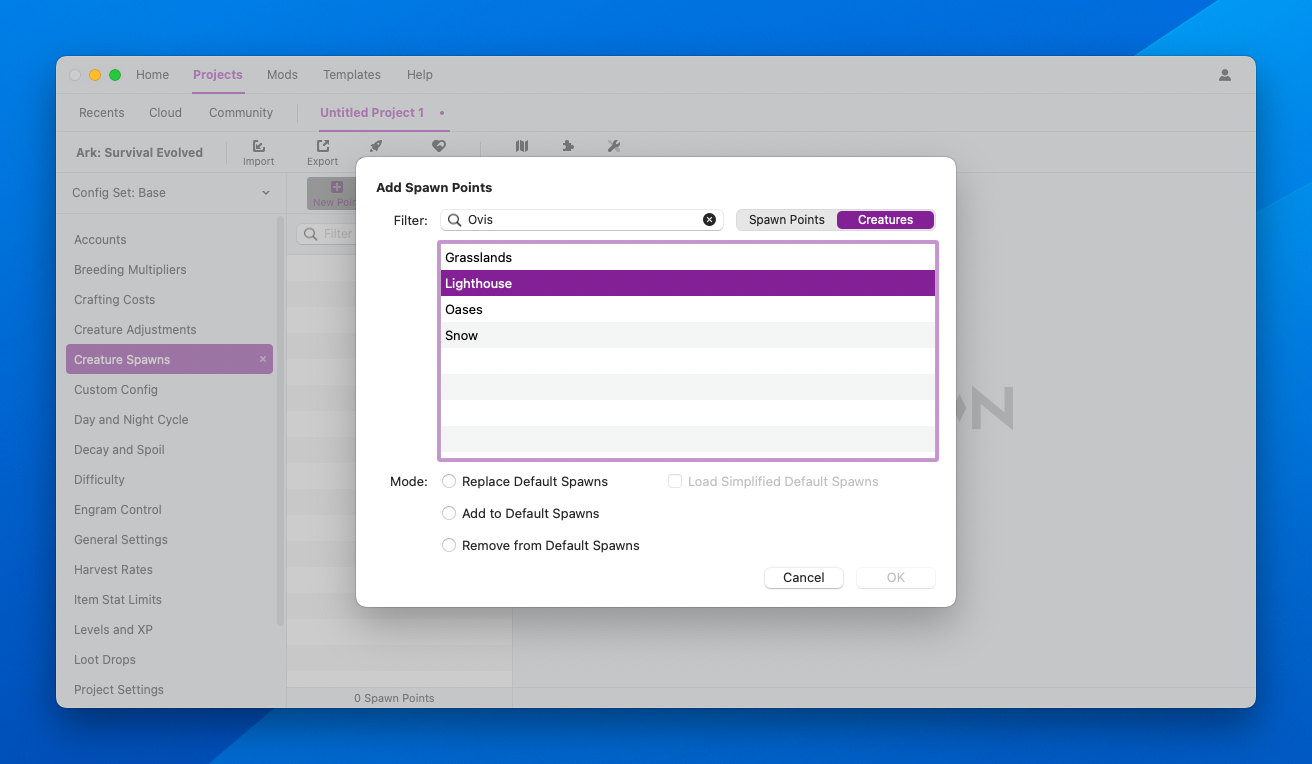
By using creatures that you know spawn in an area, the spawn maps can help figure out which spawn point to choose. For example, if you were trying to add wolves to the lighthouse area of Ragnarok, you could check the Ragnarok spawn map for ovis. This will show you SE_Oasis, Snow, Grassland, and Ragnarok_Scotland. Using the checkboxes above the map, spawn points can be turned off until we can figure out which is the one for the lighthouse area. In this case, we’re looking for Ragnarok_Scotland.
Pay attention to the rectangles on the spawn map. Each of these rectangles represents a single spawn point node. Each node has its own population limits. See Understanding Limits for more details.
Armed with this Ragnarok_Scotland spawn point, the next step is to find that in Beacon. The wiki, Ark, and Beacon each use their own naming system since spawn points don’t officially have names. The wiki’s names are based on the spawn point’s class string, which Beacon will search. Sometimes it is necessary to drop the first part of the wiki’s name, such as SE in the case of the Scorched Earth spawn points. In this case, searching for Ragnarok_Scotland shows the “Lighthouse” point in Beacon. That’s the one we’re looking for.

Another option is to set the search field to Creatures instead and search for the creature you’re looking for. This will give you the same results as the wiki’s spawn maps, but without the visuals of course.